Greetings!
It’s been a while I haven’t written anything, I was out of topics to write on.
Lately I have been working on app at my work place which strongly depends on Core Data. Which gave me an idea to write on Relationships in Core Data.
Without any further delay, Let’s get started.
You can clone the Starter Project app called BookBase, so it may help you to follow along. After cloning the app, let’s open the BookBase.xcdatamodeld.
We are going to create two Entities here, Books and an entity named Authors, then first we will understand how One-Many Relationship can be established between the two entities, then we will look into Many-Many Relationship. Cool thing about Xcode is that now it generates classes for Entities on its own.
One-Many Relationship
Click on Add Entity button and create two entities one Books and the other one named Authors. Now select the entity Books and add an attribute called bookTitle of type String and set the destination to Authors. After click on + on the Relationships section and create a relationship with named hasAuthors, uncheck the optional check because a Book will always has Author, then select the relationship and from the File inspector select the last icon and set the Type of relationship from To One to To Many. As shown in the picture below,
You have just created your first One-Many relation. We’ll go into implementations later, let’s move on to making it a Many-Many relationship.
Many-Many Relationship
A Book can have multiple Authors and an Author can have multiple Books. Inside your Authors’ entity create an attribute authorName. In your Relationship section create a new relation with name hasBooks and set the destination to Books. Change the Inverse Relationship to hasAuthors from No Inverse, and at last make the type of the relationship To Many from the File Inspector. Inverse relation ensures that the entity from which a to Many relation has been made towards the other entity also acknowledges that it has a relation to that particular entity to maintain data integrity.
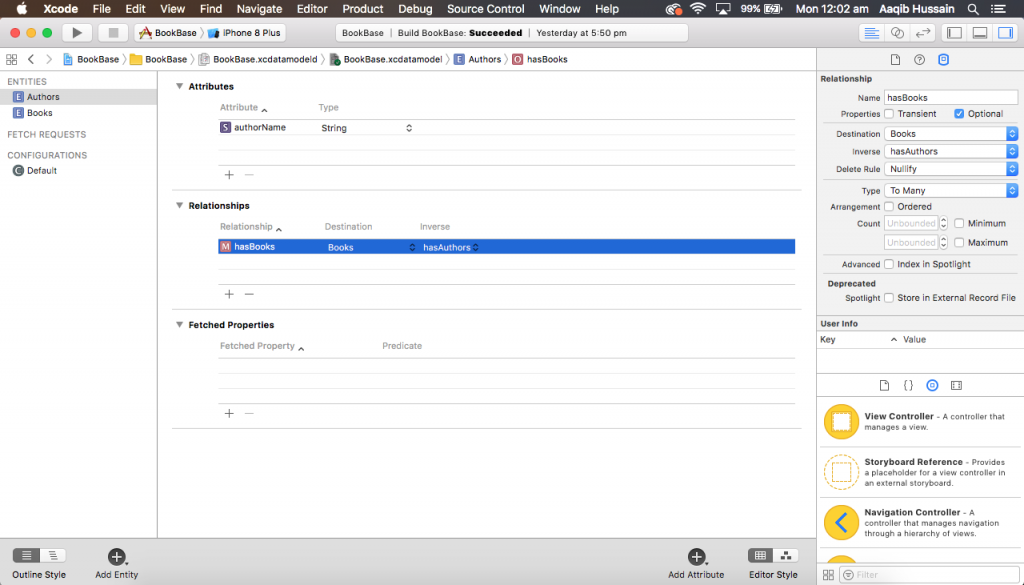
You have successfully created a Many-Many Relationship between the two entities. Let’s dive in to some code now.
We’ll create a class that will manage the adding and searching the Books from Core Data, let’s name it CoreDataManager. We’ll also create properties that will hold the fetched Books and Authors, a property that manage the context and a function that saves the context as displayed in the class below.
1 2 3 4 5 6 7 8 9 10 11 12 13 14 15 16 17 18 19 20 21 22 23 24 25 |
class CoreDataManager: NSObject { //Container Context fileprivate lazy var context: NSManagedObjectContext = { let context = (UIApplication.shared.delegate as! AppDelegate).persistentContainer.viewContext return context }() //Contains Fetched Tasks var books: [Books] = [] var authors: [Authors] = [] //MARK: init override init() { super.init() } //CoreData Save Context private func saveContext(){ (UIApplication.shared.delegate as! AppDelegate).saveContext() } } |
First we’ll create a function which will fetch all the records from CoreData and call it on the time when object of CoreDataManager is being created.
1 2 3 4 5 6 7 8 9 10 11 12 13 14 15 16 17 18 19 20 21 22 23 24 25 26 27 28 29 30 31 32 33 34 35 36 |
class CoreDataManager: NSObject { //Container Context fileprivate lazy var context: NSManagedObjectContext = { let context = (UIApplication.shared.delegate as! AppDelegate).persistentContainer.viewContext return context }() //Contains Fetched Tasks var books: [Books] = [] var authors: [Authors] = [] //MARK: init override init() { super.init() //Fetches all the data from the CoreData into the arrays declared above getAllEntities() } //Fetch from CoreData private func getAllEntities(){ do { books = try context.fetch(Books.fetchRequest()) authors = try context.fetch(Authors.fetchRequest()) } catch { debugPrint("Fetching Failed") } } //CoreData Save Context private func saveContext(){ (UIApplication.shared.delegate as! AppDelegate).saveContext() } } |
After setting these things up, we’ll create a function which will save Book title and Author name to the Core Data. But first let’s have a look at the UI.
The UI consists of two TextFields for entering Book’s title and the second one is for the Author name, and three buttons to Add, to Search, and to Refresh.
Insertion in Core Data
So we’ve seen how the UI is, now we’ll get back to writing that function which will help us to insert data in Core Data.
1 2 3 4 5 6 7 8 9 10 11 12 13 14 15 16 17 18 19 20 21 22 23 24 25 26 27 28 29 30 31 32 33 |
func saveBookToCoreData(bookTitle: String, authorName: String, completion:(_ isSaved: Bool) ->()){ guard (self.books.filter{ $0.bookTitle == bookTitle}).first != nil else { let books = Books(context: context) books.bookTitle = bookTitle let authorNameArray = authorName.split(separator: ",") var authorArray: [Authors] = [] for authorName in authorNameArray{ let filteredAuthors = authors.filter{$0.authorName!.lowercased() == String(authorName).lowercased()}.first if filteredAuthors == nil{ let author = Authors(context: context) author.authorName = String(authorName) author.addToHasBooks(books) authorArray.append(author) self.authors.append(author) }else{ filteredAuthors!.addToHasBooks(books) authorArray.append(filteredAuthors!) } } let authorSet = NSSet(array: authorArray) books.addToHasAuthors(authorSet) self.books.append(books) self.saveContext() completion(true) return } completion(false) } |
So how this function works?, First it checks if the passed Book already exist or not, if Yes, it doesn’t do anything, if No, then it creates an object of type Books, then it checks if the passed in Author name is already in the CoreData if No? then creates an Authors object, if user passes in multiple Authors separated by a “,” then that logic is also handled there, if an Author is already in the CoreData than the same object of Authors is used to create a new object of Books, a completion returns true if Book is saved successfully otherwise a false.
Fetching from Core Data
Let’s move on to writing functions for searching Books by either Author name or Book title.
1 2 3 4 5 6 7 8 9 10 11 12 13 14 15 16 17 18 |
private func searchBookByBookTitle(bookTitle: String) -> (books: [Books]?, authorsName: [String]?){ let filteredBooks = books.filter { (book: Books) -> Bool in return book.bookTitle!.lowercased().contains(bookTitle.lowercased()) } let authorsName = filteredBooks.flatMap{($0.hasAuthors?.allObjects as? [Authors]).flatMap{$0.flatMap{$0.authorName}}}.map{$0.joined(separator: ",")} return (filteredBooks, authorsName) } private func searchBookByAuthorName(authorName: String) -> (books: [Books]?, authorsName: [String]?){ let books = authors.filter({ (author: Authors) -> Bool in return author.authorName!.lowercased().contains(authorName.lowercased()) }).flatMap{$0.hasBooks?.allObjects as? [Books]}.flatMap{$0} let authorsName = books.flatMap{($0.hasAuthors?.allObjects as? [Authors]).flatMap{$0.flatMap{$0.authorName}}}.map{$0.joined(separator: ",")} return (books, authorsName) } |
What these function does is filter the ManagedObject ([Books] or [Authors]) w.r.t to arguments provided i.e. (Book title or Author name), after getting the desired Books or Author, it fetches the respective relation, and takes out the required information from it, which would be a Books and Authors. {Please don’t mind the excessive use of closure functions in the search, but I feel more comfortable using them. :)}
Just to make things look tidy.
1 2 3 4 5 6 7 8 9 10 11 12 |
func searchBook(bookTitle: String?, authorName: String?) -> (books: [Books]?, authorsName: [String]?){ if let bookName = bookTitle, bookName != ""{ return searchBookByBookTitle(bookTitle: bookName) }else if let author = authorName, author != ""{ return searchBookByAuthorName(authorName: author) } return (nil, nil) } |
Setting up the Controller
Our work in this class is done here. It’s time to move on to your ViewController. In your controller create two properties as:
1 2 |
var coreDataManager = CoreDataManager() lazy var searchedBooks: (books: [Books], authorsName: [String]) = ([], []) |
CoreDataManager object is for manipulating the data and other one is for displaying the searched results inside the tableview.
In your Add button’s @IBAction i.e addToCoreData write the following code:
1 2 3 4 5 6 7 8 9 10 11 |
guard let bookTitle = bookNameTextField.text, let authorName = authorNameTextField.text, bookTitle != "", authorName != "" else{ showAlert(title: "Cannot Proceed", message: "Both fields are required.") return } coreDataManager.saveBookToCoreData(bookTitle: bookTitle, authorName: authorName) { (isSaved) in if !isSaved{ self.showAlert(title: "Cannot Proceed", message: "This Book is already in the library.") } } clearTextFields() |
Inside the @IBAction of Search, write this:
1 2 3 |
guard let (searchBooks, authors) = coreDataManager.searchBook(bookTitle: bookNameTextField.text, authorName: authorNameTextField.text) as? ([Books], [String]) else{return} searchedBooks = (searchBooks, authors) tableView.reloadData() |
Change your TableView’s DataSource to look like this:
1 2 3 4 5 6 7 8 9 10 11 12 13 14 |
extension ViewController: UITableViewDataSource{ func tableView(_ tableView: UITableView, cellForRowAt indexPath: IndexPath) -> UITableViewCell { let cell = tableView.dequeueReusableCell(withIdentifier: "booksList", for: indexPath) cell.textLabel?.text = searchedBooks.books[indexPath.row].bookTitle cell.detailTextLabel?.text = searchedBooks.authorsName[indexPath.row] return cell } func tableView(_ tableView: UITableView, numberOfRowsInSection section: Int) -> Int { return searchedBooks.books.count } } |
In the end, in your Refresh button’s action:
1 2 3 |
searchedBooks = ([],[]) tableView.reloadData() clearTextFields() |
Build and Run
Now, Its time to build and run the app.
And add some books in it. After that try and search. Let’s search by passing in the name of the Author in the textfield.
You can try and search with a Book name as well.
Questions?
So this was all there is to it for now, and source code is available here.
If you have any questions please leave a comment below.
Sayonara!
2 Comments