Hello everyone!
After quite some time I finally got time to write.
So I am going to tell you guys how to use FireSharp.
FireSharp is a wrapper written for Firebase to use with .Net. Because Firebase doesn’t provide any support for .Net that’s why FireSharp is used to get the job done.
Lets get started!
Open Visual Studio and then New Project and create a Windows 8.1 Blank App.
Click on Tools -> NuGet Package Manager -> Manage NuGet Package for Solution
NuGet Package Manager for Solution will open up, then in the search type ‘FireSharp’ press enter, and install the wrapper.
After that open your MainPage.xaml file.
Now add a ListView, a Button, a Textbox, and an Appbar with two buttons(an Edit and a Remove).
I have named the components as “listView”, “send”, and “textBox”. You can do any way you like it.
Your MainPage.xaml might look something like this:
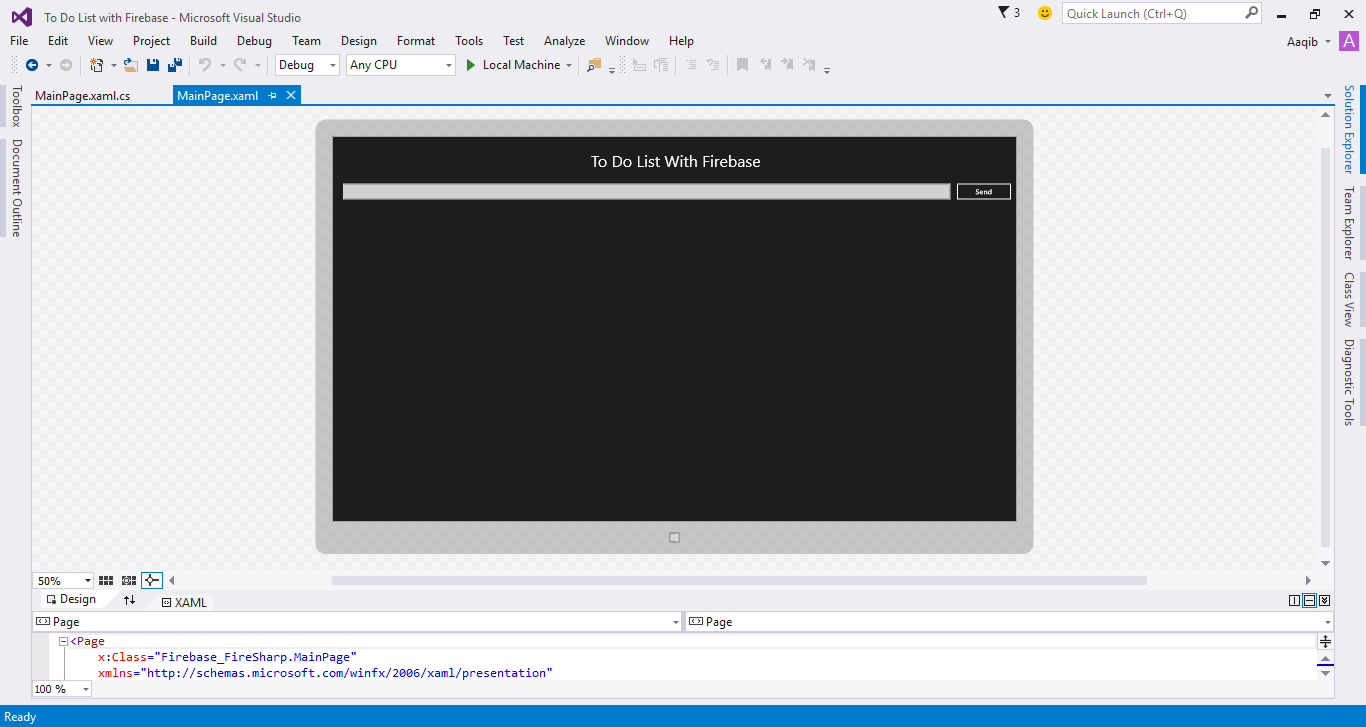
Here’s the MainPage.xaml code:
1 2 3 4 5 6 7 8 9 10 11 12 13 14 15 16 17 18 19 20 21 22 |
<Page x:Class="Firebase_FireSharp.MainPage" xmlns="http://schemas.microsoft.com/winfx/2006/xaml/presentation" xmlns:x="http://schemas.microsoft.com/winfx/2006/xaml" xmlns:local="using:Firebase_FireSharp" xmlns:d="http://schemas.microsoft.com/expression/blend/2008" xmlns:mc="http://schemas.openxmlformats.org/markup-compatibility/2006" mc:Ignorable="d"> <Grid Background="{ThemeResource ApplicationPageBackgroundThemeBrush}"> <ListView Name="listView" HorizontalAlignment="Left" Height="612" Margin="20,149,0,0" VerticalAlignment="Top" Width="1321"> </ListView> <TextBox Name="textBox" HorizontalAlignment="Left" Margin="20,93,0,0" TextWrapping="Wrap" VerticalAlignment="Top" Width="1215"/> <Button Name="send" Content="Send" HorizontalAlignment="Left" Margin="1245,90,0,0" VerticalAlignment="Top" Width="114" Click="send_Click"/> <TextBlock x:Name="textBlock" HorizontalAlignment="Left" Margin="516,32,0,0" TextWrapping="Wrap" Text="To Do List With Firebase" VerticalAlignment="Top" FontSize="32"/> </Grid> <Page.BottomAppBar> <CommandBar> <CommandBar.SecondaryCommands> <AppBarButton Label="Edit" Icon="Edit" Click="EditBarButton_Click"/> <AppBarButton Label="Remove" Icon="Remove" Click="AppBarButton_Click" /> </CommandBar.SecondaryCommands> </CommandBar> </Page.BottomAppBar> </Page> |
Now its time to open the MainPage.xaml.cs file.
First of all where we need to create a reference to our Firebase by providing our BasePath and AuthSecret to IFirebaseConfig class’s object.
1 2 3 4 5 6 7 8 9 10 11 12 13 14 15 16 17 18 |
IFirebaseConfig config = new FirebaseConfig { AuthSecret = "your-Auth-Secret", BasePath = "https://<your-link-to-firebase>.firebaseio.com/" }; IFirebaseClient client; [/code] It's time to send some data to Firebase. We will use the PushAsync function of FireSharp that saves the value on Firebase with a unique id. [code language="css"] private async void SetDataToFirebase(string text) { //Initializing FirebaseClient with reference link client = new FirebaseClient(config); Dictionary<string, string> values = new Dictionary<string, string>(); values.Add("Name", text); var response = await client.PushAsync("FireSharp/Name/", values); textBox.Text = ""; } |
Now we are going to write an event for Send button. (Send button turns into an Update button when )
1 2 3 4 5 6 |
private async void send_Click(object sender, RoutedEventArgs e) { SetDataToFirebase(textBox.Text); } |
As we proceed we’re going to use this Send button work as an Update button as well.
Since we’re finished pushing data to Firebase, we need to do some manipulation on our data i.e Updating and Removing. For that we need the unique ids on which our data is saved. To achieve that purpose we will create a dictionary that will contain all the unique ids and values, and a function that will continuously listen to Firebase and will automatically invoke if there is any change of value on Firebase.
1 2 3 4 5 6 7 8 9 10 11 12 13 14 15 16 17 18 19 20 21 22 23 24 25 26 27 28 29 30 31 32 33 34 35 36 37 38 39 40 41 |
private static Dictionary<string,string> keyHolder = new Dictionary<string,string>(); private async void ListenToStream() { client = new FirebaseClient(config); await client.OnAsync("FireSharp/Name/", (sender, args) => { //Gets the Unique ID and deletes the any other string attached to it //Contains the values string dataFromFB = args.Data; //Contains the paths something like /UID1/Name. UID1/UID2/Name .... string paths = args.Path; //Removes the Name string string key = RemoveNameSubstring(paths); //Extracts a Unique ID at each iteration string uniqueKey = key.Split('/').Last(); //Checks if Unique ID already exist or not if (keyHolder.ContainsKey(uniqueKey)) { keyHolder[uniqueKey] = dataFromFB; AddToListView(dataFromFB); } else { keyHolder.Add(uniqueKey, dataFromFB); AddToListView(dataFromFB); } }); } //Appends the passed string to ListView private async void AddToListView(string data) { listView.Items.Add(data); } public string RemoveNameSubstring(string name) { int index = name.IndexOf("/Name"); string uniqueKey = (index < 0) ? name : name.Remove(index, "/Name".Length); return uniqueKey; } |
You need to place your ListenToStream function in your MainPage’s class constructor, so that it fetches all the values as soon as the application loads.
1 2 3 4 5 6 |
public MainPage() { this.InitializeComponent(); ListenToStream(); } |
We have the Unique Ids for each of our value in our keyHolder dictionary, Now we can manipulate our data easily.
For deleting, FireSharp uses a DeleteAsync function.
1 2 3 4 5 6 7 8 9 10 11 12 |
private async void DeleteFromFirebase(string val) { client = new FirebaseClient(config); FirebaseResponse delete = await client.DeleteAsync("FireSharp/Name/"+val); var status = delete.StatusCode; //If Firebase returns OK status, value is removed from ListView if (status.ToString() == "OK") { listView.Items.Remove(listView.SelectedItem); keyHolder.Remove(val); } } |
In the event of your Appbar’s Remove button write the following snippet:
1 2 3 4 5 6 7 8 9 10 11 12 13 14 15 16 17 18 19 |
private async void AppBarButton_Click(object sender, RoutedEventArgs e) { if (listView.SelectedItem == null) { MessageDialog message = new MessageDialog("Please select an Item to Remove", "Sorry"); await message.ShowAsync(); } else { int currentIndex = listView.SelectedIndex; string currentKey = keyHolder.Keys.ElementAt(currentIndex); if (listView.SelectedItem.ToString() == keyHolder.Values.ElementAt(currentIndex)) { DeleteFromFirebase(currentKey); } } } |
Its time for some Updating. First of all update your Send button event to this:
1 2 3 4 5 6 7 8 9 10 11 12 13 14 15 16 17 18 19 20 21 22 23 24 25 26 27 28 29 30 31 32 |
private async void send_Click(object sender, RoutedEventArgs e) { Dictionary<string, string> val = new Dictionary<string, string>(); string selectedIndex; string pathToUpdate; if (send.Content.Equals("Update")) { selectedIndex = keyHolder.Keys.ElementAt(listView.SelectedIndex); pathToUpdate = selectedIndex; if (textBox.Text == "") { MessageDialog message = new MessageDialog("An updated entry cannot be empty", "Sorry"); await message.ShowAsync(); } else { val["Name"] = textBox.Text; ListUpdation(pathToUpdate, val); } } else { if (textBox.Text == "") { MessageDialog message = new MessageDialog("Enter Some Text", "Sorry"); await message.ShowAsync(); } else { SetDataToFirebase(textBox.Text); } } } |
For Updating, FireSharp uses an UpdateAsync function. In which we need to pass the Unique Id and the value that we want to update.
1 2 3 4 5 6 7 8 9 10 11 12 13 |
private async void ListUpdation(string key, Dictionary<string,string> updatedValue) { FirebaseResponse response; response = await client.UpdateAsync("FireSharp/Name/"+key, updatedValue); if (listView.SelectedIndex == 0 || listView.SelectedIndex == keyHolder.Count - 1) { keyHolder[keyHolder.Keys.ElementAt(listView.SelectedIndex)] = textBox.Text; listView.Items.Insert(listView.SelectedIndex, textBox.Text); listView.Items.RemoveAt(listView.SelectedIndex); send.Content = "Send"; } textBox.Text = ""; } |
In your Appbar’s Edit button you’ll need to do:
1 2 3 4 5 6 7 8 9 10 11 12 13 14 15 |
private async void EditBarButton_Click(object sender, RoutedEventArgs e) { if (listView.SelectedItem == null) { MessageDialog message = new MessageDialog("Please select an Item to Update", "Sorry"); await message.ShowAsync(); } else { textBox.Text = listView.SelectedItem.ToString(); send.Content = "Update"; } } } |
At last you need to update your AddToListView function, with the functionality of updating the listView instead of just appending it.
1 2 3 4 5 6 7 8 9 10 11 12 13 14 15 16 17 18 19 20 21 22 |
private async void AddToListView(string data) { //You'll have to add this RunAsync method otherwise it will give you some weird exceptions await Dispatcher.RunAsync(Windows.UI.Core.CoreDispatcherPriority.Normal, () => { if (send.Content.Equals("Update")) { listView.Items.Insert(listView.SelectedIndex, data); listView.Items.RemoveAt(listView.SelectedIndex); send.Content = "Send"; } else { listView.Items.Add(data); } }); } |
For now we are done, and good to go.
Now run and test it.
And here is the link to this project on Github.
Ciao!
4 Comments