Hola Amigos!
I’m going to demonstrate how easily you can make a simple list using Core Data with operations of Add, Delete, and Update.
Vamonos!
Make a new project, and make sure that Use Core Data is checked.

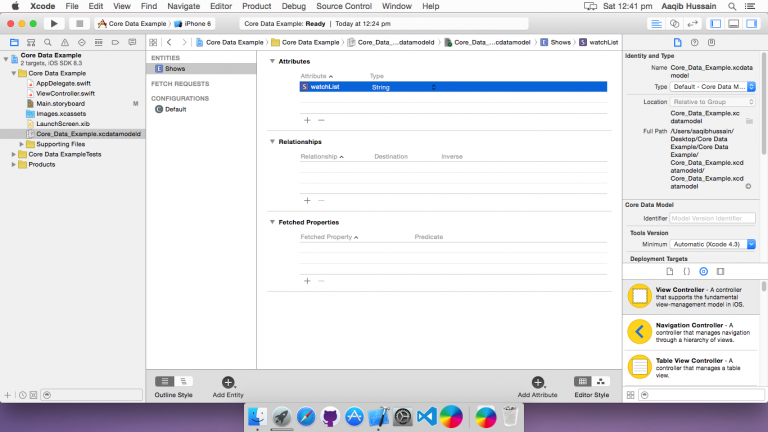
When project is created, from explorer; click .xcdatamodeld.Then click Add Entity, rename it to Shows, and in the Attributes section click the + and add an item of name watchList of type string.

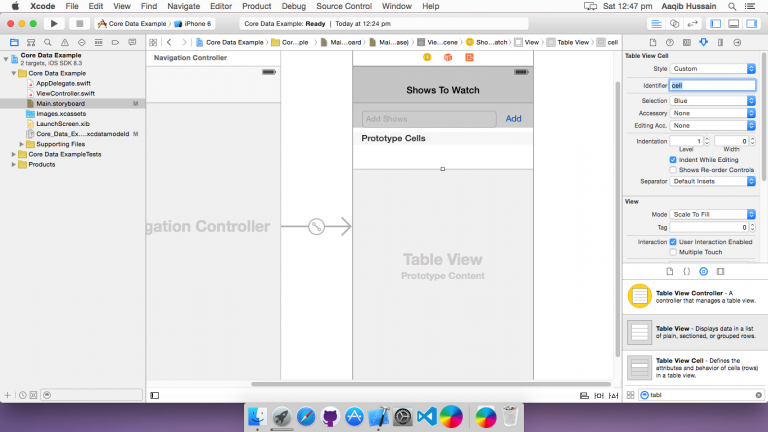
After that open your MainStoryboard. Drag and drop a TextField, a Button, a TableView, and may be a Navigation Bar if you like.

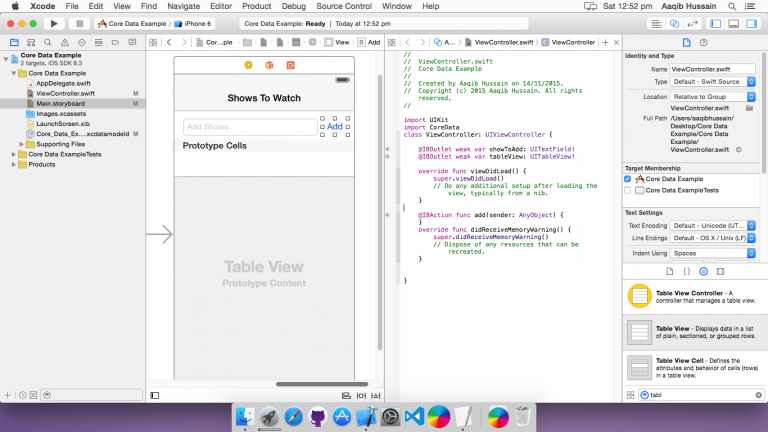
Import CoreData and make outlets for tableview and textfield, and an action event for button.

After being done with that open your ViewController. Create the following variables.
|
1 2 |
var watchList = [NSManagedObject]() let appDelegate = UIApplication.sharedApplication().delegate as! AppDelegate |
Adding Values To Core Data
Now we will create a function that we will use to add values to Core Data.
|
1 2 3 4 5 6 7 8 9 10 11 12 13 14 |
func addShow(showName: String){ let managedContext = appDelegate.managedObjectContext! let entity = NSEntityDescription.entityForName("Shows", inManagedObjectContext: managedContext) let show = NSManagedObject(entity: entity!, insertIntoManagedObjectContext:managedContext) show.setValue(showName, forKey: "watchList") var error: NSError? if !managedContext.save(&error) { println("Could not save (error), (error?.userInfo)") } watchList.append(show) } |
Then in your Button action function.
|
1 2 3 4 5 6 |
@IBAction func add(sender: AnyObject) { self.addShow(showToAdd.text) self.tableView.reloadData() showToAdd.text = "" } |
And in your numberOfRowsInSection, and cellForRowAtIndexPath functions of UITableViewDataSource.
|
1 2 3 4 5 6 7 8 9 10 11 12 |
func tableView(tableView: UITableView, numberOfRowsInSection section: Int) -> Int{ return watchList.count } func tableView(tableView: UITableView, cellForRowAtIndexPath indexPath: NSIndexPath) -> UITableViewCell{ let cell = tableView.dequeueReusableCellWithIdentifier("cell") as! UITableViewCell let shows = watchList[indexPath.row] cell.textLabel!.text = shows.valueForKey("watchList") as! String? return cell } |
Run your app. I have added the names of shows that I want to watch.

Now stop the app and run your app again you won’t see the records you recently added.

Fetching Values From Core Data
To see the records you added you need to fetch them. So in your viewWillAppear.
|
1 2 3 4 5 6 7 8 9 10 11 12 13 |
override func viewWillAppear(animated: Bool) { super.viewWillAppear(animated) let managedContext = appDelegate.managedObjectContext! let fetchRequest = NSFetchRequest(entityName:"Shows") var error: NSError? let fetchedResults = managedContext.executeFetchRequest(fetchRequest, error: &error) as! [NSManagedObject]? if let results = fetchedResults { watchList = results } else { println("Could not fetch (error), (error!.userInfo)") } } |
Run again.

Deleting Values From Core Data
Since we’re done with adding, and fetching. we’ll go for some deletion of records from Core Data. For that we will use UITableViewDataSource‘s function, tableView(_:commitEditingStyle:forRowAtIndexPath:).
|
1 2 3 4 5 6 7 8 9 |
func tableView(tableView: UITableView, commitEditingStyle editingStyle: UITableViewCellEditingStyle, forRowAtIndexPath indexPath: NSIndexPath) { if editingStyle == UITableViewCellEditingStyle.Delete { let managedContext:NSManagedObjectContext = appDelegate.managedObjectContext! managedContext.deleteObject(watchList[indexPath.row] as NSManagedObject) watchList.removeAtIndex(indexPath.row) managedContext.save(nil) self.tableView.deleteRowsAtIndexPaths([indexPath], withRowAnimation: .Fade) } } |
Run your app and slide from right to left.

After Delete operation is performed.

You can also double check the deletion by re-running the app.
Updating Values
For this purpose we are going to create two functions. 1st function will generate an alert with a textfield, whenever a user selects a cell, and the other will be handling the updates in Core Data.
|
1 2 3 4 5 6 7 8 9 10 11 12 13 14 15 16 17 18 19 20 21 22 23 24 25 26 27 28 29 30 31 32 33 34 35 36 37 |
//Receives the index of selected cell from didSelectRowAtIndexPath func updateAlertView(cellIndex: Int){ var alert = UIAlertController(title: "Show", message: "Update show name", preferredStyle: .Alert) let saveAction = UIAlertAction(title: "Update", style: .Default) { (action: UIAlertAction!) -> Void in let textField = alert.textFields![0] as! UITextField; self.updateCoreData(textField.text,index: cellIndex) self.tableView.reloadData() } let cancelAction = UIAlertAction(title: "Cancel", style: .Default) { (action: UIAlertAction!) -> Void in } alert.addTextFieldWithConfigurationHandler { (textField: UITextField!) -> Void in }; alert.addAction(saveAction) alert.addAction(cancelAction) presentViewController(alert, animated: true, completion: nil) } //Updates in Core Data func updateCoreData(value: String, index: Int){ var managedContext: NSManagedObjectContext = appDelegate.managedObjectContext! var fetchRequest = NSFetchRequest(entityName: "Shows") if let fetchResults = appDelegate.managedObjectContext!.executeFetchRequest(fetchRequest, error: nil) as? [NSManagedObject] { if fetchResults.count != 0{ var managedObject = fetchResults[index] managedObject.setValue(value, forKey: "watchList") managedContext.save(nil) } } } |
Finally, in didSelectRowAtIndexPath of UITableViewDelegate.
|
1 2 3 |
func tableView(tableView: UITableView, didSelectRowAtIndexPath indexPath: NSIndexPath) { updateAlertView(indexPath.row) } |
Build and run, then select a cell.

I updated the value of cell “Jessica Jones” to “Hellsing Ultimate”.

So, there you go. A simple list using Core Data in Swift.
You can download this project from here.
Adiós!


2 Comments