Dropbox Integration With Core API


Hello everyone, Today I am going to show you how you can integrate Dropbox to your app using Swift. So let’s get started.
Setting Up Things
First of all go to this link and create an app of permission file type. I’ll make it easy for you.


Give your app a name and Click “Create app”. you’ll get on page something looking like this.
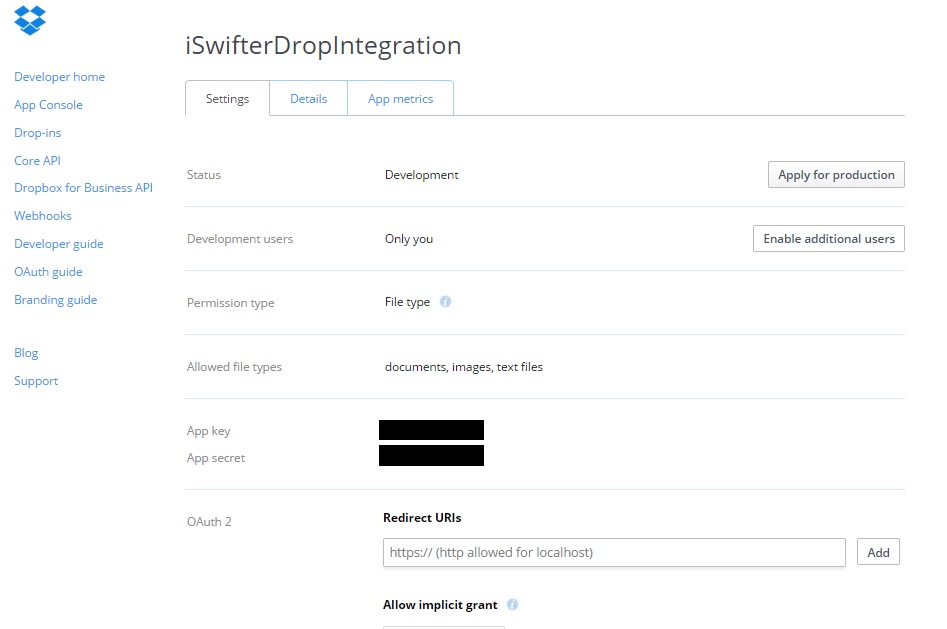

The only thing in which we are interested in is the “app key” and “app secret”, which will allow us to access Core API. Then download DropboxSDK and unzip it. Look for the file named DropboxSDK.framework. Open your project on Xcode, then drag this file to your project in the project explorer, and make sure that the Copy items… is selected. Click Finish. Also make sure that you have Security.framework and QuartzCore.framework added to your project. To do this, select your project file in the file explorer, select your target, and select the Build Phases sub-tab. Under Link Binary with Libraries, press the +button, select Security.framework, and press Add. Repeat for QuartzCore.framework, and AssetsLibrary.framwork. Now, In order to use Core API with Swift. You need to add something called a Bridging Header.
1. Right click your project, then click New File.

2. Select the Object-C File and click Next.

3. Name it temp and click Next.

4. Click Create.

5. Then click Yes.
6. Delete the temp.m file and write #import<DropboxSDK/DropboxSDK.h> to your newly added header.

Authenticating your app
You’ll need to provide both of your keys and the permission as well, for this I am using kDBRootDropbox. Once you have both the keys, you can create a DBSession object for your app. To achieve this purpose, copy the following code to your AppDelegate’s function func application(application: UIApplication, didFinishLaunchingWithOptions launchOptions: [NSObject: AnyObject]?) -> Bool.
var dBSession:DBSession = DBSession(appKey: "app_key" , appSecret: "app_secret", root:kDBRootDropbox)

DBSession.setSharedSession(dBSession)
return true
Now we will start calling the linkfromcontroller method of the DBSession class which which ask user to link their account. A Dropbox authorization view will appear with the following code when added to a button in your View Controller.
@IBAction func didPressLink(sender: AnyObject) {

if !(DBSession.sharedSession().isLinked()){
DBSession.sharedSession().linkFromController(self)

}
}
Creating a URL Scheme
To simplify the auth process SDK coordinates with the Dropbox app. But to bringing the user back to your app smoothly, you need to add a unique URL scheme that Dropbox can call. I’ll tell you how you are going to add one: Click on your project, then on the right, click Info then at the bottom click URL Types, then click the + button and add your unique “App Key” to the URL Scheme text field along with the prefix “db-” then press enter.
Uploading an Image
Lets consider we are making a image editor app, and we want to save our images on Dropbox. The DBRestClient helps us to achieve that, once the user is linked to their Dropbox account. Copy the following lines of code in your View Controller.
class ViewController: UIViewController, DBRestClientDelegate {
var dBRestClient = DBRestClient()
override func viewDidLoad() {
super.viewDidLoad()
dBRestClient = DBRestClient(session: DBSession.sharedSession())
dBRestClient.delegate = self

}
}
Since we have created the RestClient object, we are going to use the uploadFile property of its to upload an image to the root directory of that user’s Dropbox. Following piece of code can be used for that purpose.
let destDir: NSString = "/"
var localDirectory = NSSearchPathForDirectoriesInDomains(.DocumentDirectory,.UserDomainMask, true)[0] as NSString
// 'ImageName' The name of the image you're uploading.
var localPath = localDirectory.stringByAppendingPathComponent(ImageName)
// upImage is of type UIImage, its the image itself.
var imageData = NSData(data: UIImagePNGRepresentation(upImage))
imageData.writeToFile(localPath, atomically: true)
//Upload Image to Dropbox
dBRestClient.uploadFile(ImageName, toPath: destDir, withParentRev: nil, fromPath: localPath)
UIImagePickerControllerDelegate can be used to select image from the gallery, on the hand the name of the selected image can be accessed through ALAssetsLibrary class. Where toPath is the root path to Dropbox and fromPath is the path from where you’re uploading the image. The methods in DBRestClient are Asynchronous, meaning they don’t immediately return the data status they are supposed to load or upload. In order to check if data has been uploaded successfully or failed. The following callbacks do the job for you.
//Upload Delegate Functions
func restClient(client: DBRestClient!, uploadedFile destPath: String!, from srcPath: String!, metadata: DBMetadata!) {
println("File uploaded successfully to path: (metadata.path)");

}

func restClient(client: DBRestClient!, uploadFileFailedWithError error: NSError!) {
println("File upload failed with error: (error)");
}
Listing Folders
Now lets look at the files you have on your Dropbox by invoking the metadata method, it will load all the directories of the root folder. In your View Controller’s viewDidLoad method
self.dBRestClient.loadMetadata("/")
The restclient will call your delegate with the following callbacks:
func restClient(client: DBRestClient!, loadedMetadata metadata: DBMetadata) {
if (metadata.isDirectory){
var file: DBMetadata
println("Folder (metadata.filename) contains:(metadata.path)")
for file in metadata.contents {
println(file.filename)
// DropboxItems.append(file.filename!!)

}
}
}
func restClient(client: DBRestClient!, loadMetadataFailedWithError error: NSError!) {
println("Error loading metadata: (error)");
}
I have created a DropbItems String type array so that it can be used to display the directories on a UITableView.
Downloading Files
Now since we finished with uploading, now we are going to use the method loadFile to download files from Dropbox. To download files we’ll need the following method.
dBRestClient.loadFile(dropboxPath, intoPath:localPath)
Here dropboxPath is the user’s root path to Dropbox and localPath is the path where you want your file to download. To find out whether the file is downloaded or failed you’ll need to add the following callbacks to your code.
func restClient(client: DBRestClient!, loadedFile destPath: String!, contentType: String!, metadata: DBMetadata!) {

println("File loaded into path:(destPath)")
}
func restClient(client: DBRestClient!, loadFileFailedWithError error: NSError!) {
println("There was an error loading the file: (error)")

}
In order to get a hold of your localPath on your simulator you can use the following code.
var localDirectory = NSSearchPathForDirectoriesInDomains(.DocumentDirectory,.UserDomainMask, true)[0] as NSString
//Append here by the name of the file you're downloading, name of the file can be accessed by AlAssetsLibrary class
var localPath = localDirectory.stringByAppendingPathComponent("/File Name")
To check where your file is being download, you can println(localPath) to see that.
If you have a question please leave a comment.


Recent Posts
Things to know when moving to Germany
This article covers some important things you must know when you are considering a move…
Unit Testing in Android for Dummies
What is Unit Testing? In its simplest term, unit testing is testing a small piece…
Factory Design Pattern
In this article, you will learn about a type of Creational Design Pattern which is…
Creating Target specific Theme in iOS
In this tutorial, you will go through the use of targets to achieve two separate…
Facade Design Pattern
In this article, you will learn about a type of Structural Design Pattern which is…
Singleton Design Pattern
In this article you will learn about a type of Creational Design Pattern which is…
View Comments
Reblogged this on SutoCom Solutions.