

While writing an application from scratch coming up with the right architecture for it holds great value. It usually depends on the scope of the application. For instance, if it’s a small scale application with a limited scope then going with an architecture which is scalable would be an overhead.
VIPER is a flexible and scalable architecture that works on SOLID principles. It supports the theory of Clean Architecture that also emphasises on having the app’s structure divided into multiple layers. In VIPER, responsibilities are segregated and broken down into separate components.
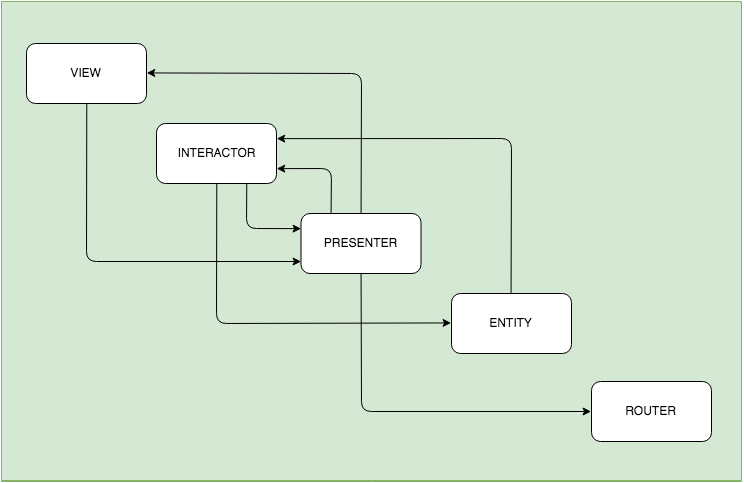
VIPER stands for:
View: In simple words, View Controller is your View. It interacts with the Presenter and it tells the View what to show and what not to.
Interactor: It is where all the business logic resides. It interacts with the Presenter to and fro for any updates that a Presenter requests. It also interacts with Entities for any data.
Presenter: It acts as a gateway between all the components. It communicates with Interactor for the data, with View for actions and updating, with Router for routing to screens.
Entity: It’s just a fancy term for a data model. It may also contain data sources or repositories.
Router/WireFrame: It’s sole purpose is to hold all the navigation logic.

To get a better grasp on it. Let’s understand it by an example. To follow along, clone or download the sample project from here.

Open the Starter Project. You’ll see a storyboard consisting of two controllers. Something like this:

Let’s get cracking with some code now.
The app is simple. You can add/edit/delete any task in it and by tapping on the cell view the full details on the next screen.
First create a new group under TaskLogger -> Entities. Inside Entities, create a file and name it as TaskItem.
struct TaskItem {

    let title: String
    let description: String?

}
The model consists of a title and its description which is optional for an specific task.
Let’s move on, and create another class under the Entities and name it TasksManager. That will be a singleton just to hold the data through a session. (Since the main focus of this tutorial is to understand the VIPER architecture. Let’s keep things simple.)
class TasksManager: NSObject {

    private override init() { }

    static let shared = TasksManager()

    var tasks: [TaskItem] = []

}
This class maintains an array of TaskItem for a session.
Let’s now work on adding and displaying some tasks in the list. Create a group and name it TaskList. Under that create a group and name it Protocols. Inside it create a file and name it TaskListProtocols (TaskList->Protocols->TaskListProtocols). And paste the following code in it.
// MARK: VIEW

protocol TaskListViewProtocol: class {

    var presenter: TaskListPresenterProtocol? { get set }

    func showTasks(_ tasks: [TaskItem])
    func showMessage(_ message: String)
}

// MARK: PRESENTER

protocol TaskListPresenterProtocol: class {

    var view: TaskListViewProtocol? { get set }
    var interactor: TaskListPresenterToInteractorProtocol? { get set }
    var router: TaskListRouterProtocol? { get set }

    func getTasks()
    func showTaskDetail(_ task: TaskItem)
    func addTask(_ task: TaskItem)
    func editTask(_ index: Int, title: String, description: String?)
    func removeTask(_ index: Int)
}

// MARK: INTERACTOR

protocol TaskListPresenterToInteractorProtocol: class {

    var presenter: TaskListInteractorToPresenterProtocol? { get set }

    func fetchTasks()
    func saveTask(_ task: TaskItem)
    func updateTask(_ index: Int, title: String, description: String?)
    func deleteTask(_ index: Int)
}

protocol TaskListInteractorToPresenterProtocol: class {

    func didAddTask(_ task: TaskItem)
    func didRemoveTask(_ index: Int)
    func didFetchTasks(_ tasks: [TaskItem])
    func didEditTasks()
    func onError(message: String)
}

// MARK: ROUTER

protocol TaskListRouterProtocol: class {

    func presentTaskListDetail(from view: TaskListViewProtocol, for task: TaskItem)
}
This might looks somewhat confusing. But bear with me. It’ll all start to make sense in a little while. ;]
Create three more groups inside the TaskList group. Naming them: Interactor, Presenter, and Router with files inside named TaskListInteractor, TaskListPresenter, and TaskListRouter respectively, and also create a group View under TaskList and move your TaskListViewController under it.
Your folder structure would look something like this:

The purpose of creating these files is to implement all the protocols written in the TaskListProtocols file.
Let’s start by implementing the Interactor first. Open your TaskListInteractor and paste the following code:
class TaskListInteractor: TaskListPresenterToInteractorProtocol {
    //1
    var presenter: TaskListInteractorToPresenterProtocol?
    //2
    var tasksManager = TasksManager.shared
    var tasks: [TaskItem] {
        return tasksManager.tasks
    }
    //3
    func fetchTasks() {
        presenter?.didFetchTasks(tasks)
    }
    //4
    func saveTask(_ task: TaskItem) {
        if task.title.isEmpty {
            presenter?.onError(message: "Title cannot be empty")
        } else {
            tasksManager.tasks.append(task)
            presenter?.didAddTask(task)
        }
    }
    //5
    func updateTask(_ index: Int, title: String, description: String?) {
        if title.isEmpty {
            presenter?.onError(message: "Title cannot be empty")
        } else {
            let task = TaskItem(title: title, description: description)
            tasksManager.tasks[index] = task
            presenter?.didEditTasks()
        }
    }
    //6
    func deleteTask(_ index: Int) {
        tasksManager.tasks.remove(at: index)
        presenter?.didRemoveTask(index)
    }

}
Before going any further. Let’s understand the difference between TaskListPresenterToInteractorProtocol and TaskListInteractorToPresenterProtocol. TaskListPresenterToInteractorProtocol is the Presenter asking the Interactor to do something. For instance, save a task or fetch the list of tasks. Whereas, TaskListInteractorToPresenterProtocol is the Interactor informing the Presenter back that it has done its part.
//1 – Object for Interactor to inform back to Presenter.
//2 – Object and array of all the tasks shared across the app using a single object.
//3 – Sends all the tasks to Presenter.
//4 – Saves a tasks.
//5 – Updates a task on a certain index.
//6 – Deletes a task from a certain index.
Open the TaskListPresenter and add the following code in it.
class TaskListPresenter: TaskListPresenterProtocol {
    //1
    var view: TaskListViewProtocol?
    var interactor: TaskListPresenterToInteractorProtocol?
    var router: TaskListRouterProtocol?
    //2
    func getTasks() {
        interactor?.fetchTasks()
    }
    //3
    func showTaskDetail(_ task: TaskItem) {
        guard let view = view else { return }
        router?.presentTaskListDetail(from: view, for: task)
    }
    //4
    func addTask(_ task: TaskItem) {
        interactor?.saveTask(task)
    }
    //5
    func editTask(_ index: Int, title: String, description: String?) {
        interactor?.updateTask(index, title: title, description: description)
    }
    //6
    func removeTask(_ index: Int) {
        interactor?.deleteTask(index)
    }

}
//1 – view on which this (TaskListViewProtocol) protocol is implemented to listen to the data changes. The property of interactor here is the one which was implemented above. The reason of creating this property here is to pass data from this Presenter to the Interactor implemented earlier. The router property is for routing from the view assigned to it.
//2 – Calls the interactor to fetch tasks.
//3 – Tells the router to show a particular task.
//4, 5, 6 – Add, update or delete a task using the interactor.
To give updates to the Presenter from the Interactor. Inside the same file, do:
extension TaskListPresenter: TaskListInteractorToPresenterProtocol {
    //1
    func didAddTask(_ task: TaskItem) {
        interactor?.fetchTasks()
    }
    //2
    func didEditTasks() {
        interactor?.fetchTasks()
    }
    //3
    func didRemoveTask(_ index: Int) {
        interactor?.fetchTasks()
    }
    //4
    func didFetchTasks(_ tasks: [TaskItem]) {
        view?.showTasks(tasks)
    }
    //4
    func onError(message: String) {
        view?.showMessage(message)
    }

}
//1, 2, 3 – Fetch the latest task, after a change is done.
//4, 5 – Update the UI.
And now in your TaskListRouter.
class TaskListRouter: TaskListRouterProtocol {

    func presentTaskListDetail(from view: TaskListViewProtocol, for task: TaskItem) {
        guard let tasklistViewController = view as? UIViewController else {
            return
        }
        tasklistViewController.navigationController?.pushViewController(taskDetail, animated: true)
    }

}
For now this chunk of code simply is for navigating to the detail screen.
At this point the Presenter, Interactor and Router are all set up for the TaskListViewController.
After seeing all this code and not yet being able to add a task, probably would have made you wonder.

Hang in there lad! You’re almost there.
Adding a Task
Inside your TaskListViewController create two properties.
var presenter: TaskListPresenterProtocol?
var tasks: [TaskItem] = []
and also add a function.
private func addTask() {
   let alertController = UIAlertController(title: "Add Task", message: "", preferredStyle: .alert)
   alertController.addTextField(configurationHandler: nil)
   alertController.addTextField(configurationHandler: nil)
   let saveAction = UIAlertAction(title: "Save", style: .default, handler: { [weak self] alert in
   let titleText = alertController.textFields![0].text ?? ""
   let descriptionText = alertController.textFields![1].text ?? "NA"
   let taskItem = TaskItem(title: titleText, description: descriptionText)
   self?.presenter?.addTask(taskItem)
   })
   let cancelAction = UIAlertAction(title: "Cancel", style: .cancel, handler: nil)
   alertController.addAction(saveAction)
   alertController.addAction(cancelAction)
   present(alertController, animated: true, completion: nil)
}
Above function creates an alert controller with textfields and passes the TaskItem to the presenter once Save is tapped.
Now inside your @IBAction addTask.
@IBAction func addTask(_ sender: UIBarButtonItem) {
  addTask()
}
Change your UITablviewDataSource functions to make it look like:
//MARK: TableView Datasource

override func tableView(_ tableView: UITableView, cellForRowAt indexPath: IndexPath) -> UITableViewCell {
  let cell = tableView.dequeueReusableCell(withIdentifier: String(describing: UITableViewCell.self), for: indexPath)
  let tasks = self.tasks[indexPath.row]
  cell.textLabel?.text = tasks.title
  cell.detailTextLabel?.text = tasks.description
  return cell
}

override func tableView(_ tableView: UITableView, numberOfRowsInSection section: Int) -> Int {
  return tasks.count
}
Conform to the TaskListViewProtocol.
extension TaskListViewController: TaskListViewProtocol {

    func showTasks(_ tasks: [TaskItem]) {
        self.tasks = tasks
        tableView.reloadData()
    }

    func showMessage(_ message: String) {
        showAlert(message)
    }

    private func showAlert(_ message: String) {
        let alertController = UIAlertController(title: "Error", message: message, preferredStyle: .alert)
        let okAction = UIAlertAction(title: "OK", style: .default, handler: nil)
        alertController.addAction(okAction)
        present(alertController, animated: true, completion: nil)
    }
}
It’s time to setup presenter and the rest of the dependencies i.e interactor, view, and router.
private func setupPresenter() {
 let presenter: TaskListPresenter & TaskListInteractorToPresenterProtocol = TaskListPresenter()
 self.presenter = presenter
 let interactor = TaskListInteractor()
 self.presenter?.interactor = interactor
 interactor.presenter = presenter
 self.presenter?.router = TaskListRouter()
 self.presenter?.view = self
}
Call the above method in viewDidLoad. The only reason these dependencies are injected here because this controller is not loaded inside the didFinishLaunchingWithOptions of the AppDelegate otherwise this would have been moved to the TaskListRouter. Don’t get confused this all will make sense soon.
After that build and run it and let’s test it by adding a task. You’ll see something like this:

Tap on +.
Add a title for e.g: “Learn Django” and in the description add “In the next 6 months” then tap on Save. Your task will be added as you can see below:
You have successfully added your first task to the list. Let’s now look at how the update and delete is done.
Updating and Deleting a Task
Updating:
Add the following method inside your TaskListViewController.
private func updateTask(index: Int, task: TaskItem) {
  let alertController = UIAlertController(title: "Update Task", message: "", preferredStyle: .alert)
  alertController.addTextField { $0.text = task.title }
  alertController.addTextField { $0.text = task.description }
  let updateAction = UIAlertAction(title: "Update", style: .default, handler: { [weak self] alert in
      let titleText = alertController.textFields![0].text ?? ""
      let descriptionText = alertController.textFields![1].text ?? "NA"
      self?.presenter?.editTask(index, title: titleText, description: descriptionText)
  })
  let cancelAction = UIAlertAction(title: "Cancel", style: .cancel, handler: nil)
  alertController.addAction(updateAction)
  alertController.addAction(cancelAction)
  present(alertController, animated: true, completion: nil)
}
This method opens the task you want to edit in an alert controller with textfields like the one you have for adding a task. Moreover, implement the editActionsForRowAt of the UITableViewDelegate and make it look like this:
override func tableView(_ tableView: UITableView, editActionsForRowAt indexPath: IndexPath) -> [UITableViewRowAction]? {

 let edit = UITableViewRowAction(style: .default, title: "Edit") { (action, indexPath) in
    let task = self.tasks[indexPath.row]
    self.updateTask(index: indexPath.row, task: task)
    }
    edit.backgroundColor = UIColor.lightGray

  return [edit]

}
Deleting:
For the deleting part. Update your editActionsForRowAt to look something like:
override func tableView(_ tableView: UITableView, editActionsForRowAt indexPath: IndexPath) -> [UITableViewRowAction]? {

 let edit = UITableViewRowAction(style: .default, title: "Edit") { (action, indexPath) in
    let task = self.tasks[indexPath.row]
    self.updateTask(index: indexPath.row, task: task)
    }
    edit.backgroundColor = UIColor.lightGray

 let delete = UITableViewRowAction(style: .destructive, title: "Delete") { (action, indexPath) in
     self.presenter?.removeTask(indexPath.row)
    }
  return [edit, delete]

}
Build and run. Since there is no persistence layer so you’ll have to add a task again. Add the same task again first. Then swipe from right to left. You’ll see two buttons Edit and Delete.
Tap on Edit and change the description to something like “In the next 6 months because I have made a huge mistake.” (No offense intended if you’re a python developer. ;])
Tap on Update and you’ll see the change instantly.
Test the delete functionality as well by swiping from right to left. Tap on the Delete button and you shouldn’t see anymore task in your list.
Let’s now move to the detail screen part. Create a group and name it TaskDetail inside it create groups View, Protocols, Presenter, Interactor, and Router. Furthermore, move the TaskDetailViewController inside the View group and create files TaskDetailProtocols, TaskDetailPresenter, TaskDetailInteractor, and TaskDetailRouter respectively. Your hierarchy should look similar to the one above in the TaskList module.
Open your TaskDetailProtocols and paste the following code:
// MARK: VIEW

protocol TaskDetailViewProtocol: class {

    var presenter: TaskDetailPresenterProtocol? { get set }

    func showTask(_ task: TaskItem)
}

// MARK: PRESENTER

protocol TaskDetailPresenterProtocol: class {

    var view: TaskDetailViewProtocol? { get set }
    var interactor: TaskDetailPresenterToInteractorProtocol? { get set }

    func showDetail()
}

// MARK: Interactor

protocol TaskDetailPresenterToInteractorProtocol: class {
    var taskItem: TaskItem? { get set }
}

// MARK: ROUTER

protocol TaskDetailRouterProtocol: class {

    static func getTaskDetailRouter(with task: TaskItem) -> UIViewController?

}
Here there was no need to create an interactor protocol which informs back to the presenter because this screen just shows data and no data manipulation is done here.
Open your TaskDetailPresenter and write the following code:
class TaskDetailPresenter: TaskDetailPresenterProtocol {

    var view: TaskDetailViewProtocol?
    var interactor: TaskDetailPresenterToInteractorProtocol?

    //1
    func showDetail() {
        guard let task = interactor?.taskItem else { return }
        view?.showTask(task)
    }

}
//1 – Passes the task to the view.
Now in your TaskDetailInteractor.
class TaskDetailInteractor: TaskDetailPresenterToInteractorProtocol {
    //1
    var taskItem: TaskItem?
}
//1 – Holds the passed in task.
In your TaskDetailRouter.
class TaskDetailRouter: TaskDetailRouterProtocol {
    //1
    static func getTaskDetailRouter(with task: TaskItem) -> UIViewController? {
        guard let taskDetailViewController = storyboard.instantiateViewController(withIdentifier: String(describing: TaskDetailViewController.self))  as? TaskDetailViewController else {
            return nil
        }

        let presenter = TaskDetailPresenter()
        taskDetailViewController.presenter = presenter
        presenter.view = taskDetailViewController
        let interactor = TaskDetailInteractor()
        interactor.taskItem = task
        presenter.interactor = interactor

        return taskDetailViewController
    }

    static var storyboard: UIStoryboard {
        return UIStoryboard(name: "Main", bundle: Bundle.main)
    }

}
//1 – Returns the object of TaskDetailViewController with all the dependencies injected i.e presenter, view, interactor and the task.
Open TaskListRouter and update presentTaskListDetail to:
func presentTaskListDetail(from view: TaskListViewProtocol, for task: TaskItem) {
  guard
  let tasklistViewController = view as? UIViewController,
  let taskDetail = TaskDetailRouter.getTaskDetailRouter(with: task) else {
  return
  }
  tasklistViewController.navigationController?.pushViewController(taskDetail, animated: true)
}
Open TaskDetailViewController and add the following property:
var presenter: TaskDetailPresenterProtocol?
and call its method in the viewDidLoad:
presenter?.showDetail()
and also implement the TaskDetailViewProtocol:
extension TaskDetailViewController: TaskDetailViewProtocol {

    func showTask(_ task: TaskItem) {
        titleLabel.text = task.title
        descriptionTextView.text = task.description
    }
}
Now head back to TaskListViewController and add didSelectRowAt of the UITableViewDelegate with the following code:
override func tableView(_ tableView: UITableView, didSelectRowAt indexPath: IndexPath) {
  let task = tasks[indexPath.row]
  presenter?.showTaskDetail(task)
}
Run the app, add the task again and tap on it. You’ll see the detail screen as follows:
Give yourself a pat on the back. You’ve successfully made a TaskLogger app using the VIPER architecture.

What to do now?
By the end of this tutorial. You must have a good idea about how VIPER works. You can find the complete source code in the link attached in the start. There are also links to some good reads you should have a look at.
If you’re looking for something on using VIPER in Android. You should check out this:
If you have any questions or queries please feel free to leave it in the comment section below.


Recent Posts
Things to know when moving to Germany
This article covers some important things you must know when you are considering a move…
Unit Testing in Android for Dummies
What is Unit Testing? In its simplest term, unit testing is testing a small piece…
Factory Design Pattern
In this article, you will learn about a type of Creational Design Pattern which is…
Creating Target specific Theme in iOS
In this tutorial, you will go through the use of targets to achieve two separate…
Facade Design Pattern
In this article, you will learn about a type of Structural Design Pattern which is…
Singleton Design Pattern
In this article you will learn about a type of Creational Design Pattern which is…
View Comments
nice article Aqib. Can you please elaborate what problem does VIPER solve which MVVM doesn't. Thanks